Search Box:   
Showing posts with label WindowsXP. Show all posts

Windows 7 Theme For XP

| Tuesday, October 7, 2008 |

Firstly, sorry for the lack of postings recently. I was a bit busy with a cricket tournament in my college. But I'll try to be regular from now on.
I recently got a windows 7 theme through Tech Yard and installed it on my PC. Believe me its really cool and I loved it.For this Cool theme I would definitely like to thank Avinash.
Here is a snapshot and the way to install the theme.

Installing the Windows 7 Theme

  1. Download the Theme ZIP file.
  2. Patch the “uxtheme.dll” file to allow 3rd party visual styles,Download and run the UXtheme Patcher from here:
    XP SP2 Users : Download
    XP SP3 Users : Download
  3. Extract the ZIP File and you will find the following folders
    I.Balero – The vista like start button.
    II.Styler - Styler Toolbar” which can entirely changes the default Windows XP’s toolbar.Requires Styler to be installed first, It can be downloaded from here.
    III.Windows 7 Start Menu – Replaces the default XP start menu with a newer version.
    IV.Wallapaper.
  4. Now open the Windows 7 M1 VS folder and double click on Windows 7 M1 VS.msstyles and apply the theme.


Read more...


Shutdown XP Faster

| Thursday, September 18, 2008 |


When a user shuts down Windows XP, first the system has to kill all services
currently running. Every once in a while the service does not shut down
instantly and windows gives it a change to shut down on its own before it kills it.
This amount of time that windows waits is stored in the system registry.
If you modify this setting, then windows will kill the service earlier. To modify
the setting, follow the directions below:

Start Regedit.
Navigate to HKEY_LOCAL_MACHINE/SYSTEM/CurrentControlSet/Control.
Click on the "Control" Folder.
Select "WaitToKillServiceTimeout"
Right click on it and select Modify.
Set it a value lower than 2000 (Mine is set to 200).


Read more...


Win XP CD including drivers and softwares

| Tuesday, September 2, 2008 |

Now here is a cool tip for which I was waiting for long.I live in hostel and love experimenting with softwares. Many a times while uninstalling a software things go wrong and the ultimate solution left for me is to format my disk and reinstall windows. But then I am left to face another challenging task to reinstall all the softwares and addons and drivers once again.

Windows XP DVD including drivers and software


I was going through a post on one of the blogs and found out that now I can make a Windows CD/DVD with all the drivers,utilities,addons and hostfixes in that same CD/DVD.This type of installation CD/DVD will save you lot of time and the burden of installing all previously existed softwares, especially if you use lot of software applications like me.
MoiN has come up with a great guide on how to create Windows XP installation CD/DVD with latest hotfixes, drivers, DirectX, IE7, WMP11, Office 2007, and any software that you like to include. You can also remove useless components, apply tweaks and system hacks for best performance.


Read more...


Minimize Running Application to Desktop as Thumbnail

| Friday, August 22, 2008 |

miniMIZE is a small desktop enhancing application that catches windows that you minimize and puts a thumbnail of the main application window on your desktop.
minimize program to desktop as thumbnail
miniMIZE supports exclusion list to ignore windows and applications that you don’t want to minimize to desktop as thumbnail. It also has hotkeys to cycle thumbnail levels, minimize all windows and show/hide thumbnails.
Latest Version: Build 1.0.37 (Public Beta 3)

  • Ability to change start position of thumbnail placement
  • Ability to change direction of thumbnail placement
  • miniMIZE now cleans up after crashed applications
  • Changing the default window level no longer affects current thumbnails
  • Access to miniMIZE help from the context menu
  • Fixed window level from being lost on restore and re-minimize of a window
  • A number of fixes for strangeness that appeared when Explorer crashes
This application works only for Windows XP users
Download


Read more...


Fix Chech Disk Error At startup

| Sunday, August 17, 2008 |

[Image]
Most of you might be aware of the problem I am talking about.Mainly this problem is due to the fact that the drive partition is in FAT32 form rather than in NTFS form. It may also be caused due to a virus as in my case.I have faced this problem every time I switched on my system and was sick of it.o I decided to cure and found a satisfactory answer by Sensible Guy.

There are 2 methods disable disk checking at Windows startup. and read below to know.


Method 1:Registry Editing

To disable go to the following registry key:

HKEY_LOCAL_MACHINE\SYSTEM\CurrentControlSet\Control\Session Manager

In the right hand pane, double click BootExecute.

The default value of the key is autocheck autochk *

* means every drive is checked for consistency. Just add /K:C at the end before *. /K switch will disable autocheck on C: drive at Windows startup. So the final value should look like this:

autocheck autochk /k:C *

If you want to add more drives, the key should look like this: (disabling C and D drives)

autocheck autochk /k:C /k:D *

If you want to restore everything to default, just replace the key with the default one i.e.,

autocheck autochk *

Method 2: CHKNTFS


go to Start –> Run –> cmd.

If you want to disable check disk on C: drive, use the following command on command prompt.

chkntfs /X C:

If you want to disable check disk on two or more drives, just keep on adding the drives:

chkntfs /X C: D: E:

This will disable check disk on C, D and E drives.

If you want to restore what you have done, that is, enable automatic disk checking on all the drives again, just run the following command:

chkntfs /D

This will restore all the drives to automatic disk checkup.


Read more...


Disable/Enable shutdown in start menu

| Tuesday, August 12, 2008 |

Here is the step by step procedure you need to follow to enable or disable the shutdown/ turn off from start menu or task manager or even from windows security dialog box.

1. Click Start > Run.

2. Type gpedit.msc and press enter to open the group policy editor.

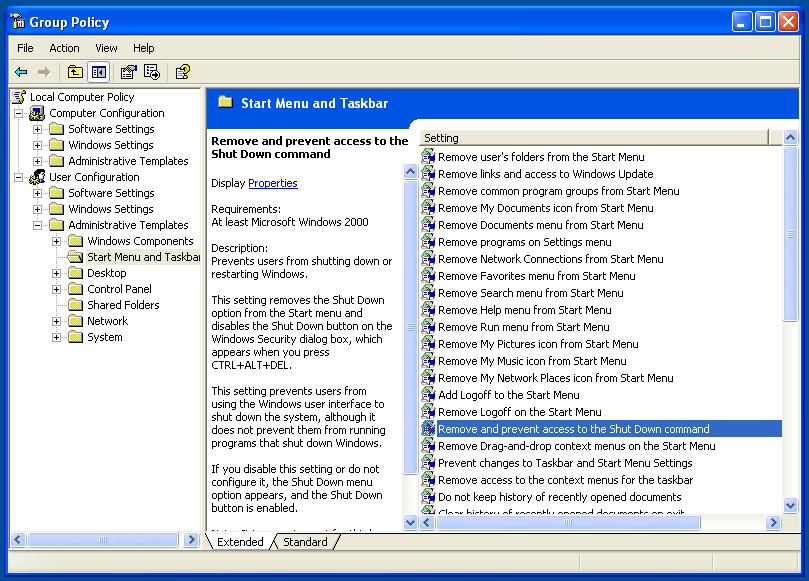
3. Under the User Configuration, goto Administrative templates and further move on to Start Menu and Taskbar.

Group policy editor

Under t hat menu, find Remove and prevent access to Shut Down command, double click on that to open a setting dialog box.

  • Set it to enabled to disable the turn off option on your windows.
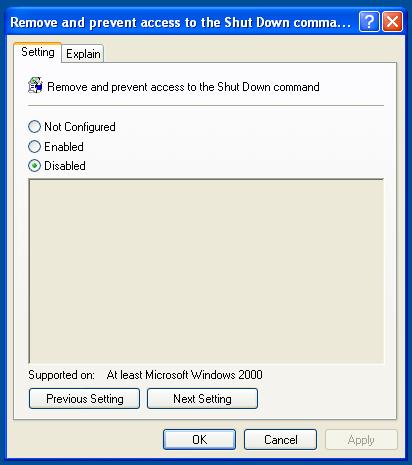
  • Set it to disabled to enable the turn off option on your windows.

Hide or unhide shutdown option

Setting for Log off option:

Follow the same procedure as above, but choose Remove Logoff on start menu in step 4.

Here is the explanation for Remove and prevent access to shut down command as provided by Microsoft:

Prevents users from shutting down or restarting Windows.

This setting removes the Shut Down option from the Start menu and disables the Shut Down button on the Windows Security dialog box, which appears when you press CTRL+ALT+DEL.

This setting prevents users from using the Windows user interface to shut down the system, although it does not prevent them from running programs that shut down Windows.

If you disable this setting or do not configure it, the Shut Down menu option appears, and the Shut Down button is enabled.

Note: It is a requirement for third-party applications with Windows 2000 or later certification to adhere to this setting.

And the below one for Remove logoff from start menu:

Removes the "Log Off " item from the Start menu and prevents users from restoring it.

If you enable this setting, the Log Off item does not appear in the Start menu. This setting also removes the Display Logoff item from Start Menu Options. As a result, users cannot restore the Log Off item to the Start Menu.

If you disable this setting or do not configure it, users can use the Display Logoff item to add and remove the Log Off item.

This setting affects the Start menu only. It does not affect the Log Off item on the Windows Security dialog box that appears when you press Ctrl+Alt+Del, and it does not prevent users from using other methods to log off.

Tip: To add or remove the Log Off item on a computer, click Start, click Settings, click Taskbar and Start Menu, click the Start Menu Options tab and, in the Start Menu Settings box, click Display Logoff.

See also: "Remove Logoff" in User Configuration\Administrative Templates\System\Logon/Logoff.

Thanks Pavan Kumar]


Read more...


Set time limit for your users in XP

| Monday, August 11, 2008 |

I loved his info on Tech-Reciepies.com because it is extremely useful for a guy like me who lives in hostel and who has so many users of his computer. Setting a time limit helps me a lot and restricts other people overusing my computer.

The method is a very simple one and just have to type a simple command on the command prompt.


1. Open a command prompt.


2. Execute the following command:

net user /time:M-F,9AM-9PM


where username is the name of the user you wish to limit. The days can be modified using M,T,W,Th,F,Sa and Su. The time can also be changed but must be in hourly increments.

You can also use different times for each day:

net user /time:M,-F,9AM-9PM;Sa,9AM-10PM;Su,12PM-8PM


Read more...