Search Box:   
Showing posts with label cool fundas. Show all posts

Browse Pay sites for free !!

| Tuesday, April 14, 2009 |

I found a very interesting post recently on Sumesh's site while I was going through my subscriptions and I liked it so much that I decided to share it with you. So many times we come across sites that demand money to show your favorite content. This becomes quite disappointing for us as we have to spend a large amount to view our favorite content, but in some of these sites we can go through our favorite content without paying any money.
This can be done if we disguise ourself as a search bot because some of these sites allow the search bots to let in without any payment to increase the hits on their sites.They detect search bots by its User Agent attribute (for Firefox, it is Mozilla 5.0), and allow only bots in. Hence you can exploit this weakness of the sites that these sites have created themselves.

The user agent defines the browser, what OS you are using, and other small bits of information.information. Switching user agent in various browsers require seperate procedure, as follows: Visit DNSStuff to know your current user agent. Visiting it gave me the following report:


Changing the user agent is easy:

  • Browse pay sites on Firefox

    Install User Agent Switcher Firefox extension and import this XML file by TechPatterns (do not click the link directly, instead right click and save) that has the required Googlebot/2.1. Once the file is loaded, configure your user agent to Googlebot 2.1

  • Pay sites on Internet Explorer

    Change a registry entry, by opening Notepad, then copying the code below into it:

    Windows Registry Editor Version 5.00 [HKEYLOCALMACHINESOFTWAREMicrosoftWindowsCurrentVersionInternet Settings5.0User Agent] @=”Googlebot/2.1″ “Compatible”=”+http://www.googlebot.com/bot.html”

    Save as “uagent.reg” (with the quotes). Double click on it to load the setting. You could also go to the Registry directly, but my guess is that at least some of you are not comfortable working with the Registry.

    To remove the hack, copy the following code into a Notepad window and save as “originaluagent.reg” (with the quotes) and double click it:

    Windows Registry Editor Version 5.00 [HKEYLOCALMACHINESOFTWAREMicrosoftWindowsCurrentVersionInternet Settings5.0User Agent] @=”Mozilla/4.0 (compatible; MSIE 6.0; Windows NT 5.1)”

Finally, test whether the hack has taken effect by pointing your browser to DNSStuff website. The user agent should now be “Googlebot” according to DNSStuff.


Read more...


Find who is invisible on Galk

| Sunday, April 12, 2009 |


Many people now days like remain on an invisible mode on GTalk.Even today when I was online this morning my friend was invisible on Gtalk. I wanted to chat with him but I didn't know he was online to.It was later in the dy that I came to know that he was online.
One of my friends once told me that there is a way to detect who is invisible on GTalk so today I searched For the trick and found it on Vishal's blog.

The trick goes like this:

1. Set the chat as off the record with target user.

2. Open the chat window of person, whom you want to check if Invisible or Offline. Go to Options and click "Go Off Record".

3. Now send message to that user

4. If you get the message that "The user is offline and can’t receive messages right now " that means the user is offline.

5. But if you didn’t get any message that means User is online and is in invisible mode..:)


Read more...


Change the Browser Title

| Wednesday, September 24, 2008 |

Have you ever thought of changing the title of your web browser? If not will you like to do that and give a browser your own name?
I did it and made it Microsoft Internet Explorer by Himanshu. Like my earlier post Watch Movies in MS Paint this tweak can be used to impress your friends.


This tweak Customize the Title of the Internet Explorer.

1. Click Start > Run > Type gpedit.msc
2. Click User Configuration > Windows Setting > Internet Explorer Maintenance > Browser User Interface
3. Double click on Browser Title
4. Click on Customize Title Bars
5. type in whatever you want
6. Click OK

Now you changed the title of your browser and you sure see what you wrote when you
open a New Widow.


Read more...


Watch movies in MSPaint

| Sunday, September 21, 2008 |

Hey maybe some of you might know about this trick but if you don't know then here is a cool tip of playing movies in Ms Paint.Though you don't require to do that but it might help you make an impression on your friends.

Here is how to do that:

1-First open any movie in a player [I used windows media player]

2-Take a full screen capture with print screen key which is near to F12 key.

3-Open MS Paint

4-Hit Ctrl+V or got to Edit>>Paste.

The controls will not work here and don’t minimize the original movie window or it will stop working. What it does is actually copy from the original source, nothing special. But at least enough to drop jaws of others.


Read more...


Replace My Pictures and My Music shorcuts in Start Menu

| Thursday, September 18, 2008 |

Today I came across two very good vbscripts that will customize your Start Menu.I always felt that the My Music and My Pictures shortcut in the Start Menu are useless for me because I never store anything in these two folders. But these two shortcuts were present in the start menu by default, so I was feeling helpless in this case as I wa snot finding an appropraite way to repalce them with other items.But these two VB scripts helped me solve my problem.
These scripts change the registry settings of your Start Menu.


All you have to do to customize your Start Menu is to save the two script files- replace My Pictures VB script and the replace My Music VB script by right-clicking each link on your PC, then double-click to run them. Enter the new path you want to appear in your Start Menu (even a network location, like to a shared music folder), and then you have to log off and back into your PC to see your changes.


Read more...


Shutdown XP Faster

| |


When a user shuts down Windows XP, first the system has to kill all services
currently running. Every once in a while the service does not shut down
instantly and windows gives it a change to shut down on its own before it kills it.
This amount of time that windows waits is stored in the system registry.
If you modify this setting, then windows will kill the service earlier. To modify
the setting, follow the directions below:

Start Regedit.
Navigate to HKEY_LOCAL_MACHINE/SYSTEM/CurrentControlSet/Control.
Click on the "Control" Folder.
Select "WaitToKillServiceTimeout"
Right click on it and select Modify.
Set it a value lower than 2000 (Mine is set to 200).


Read more...


Increase Vista Boot Speed

| Tuesday, September 16, 2008 |

This method is for those who use dual core or quad core processors and wish to speed up the boot up time of your vista operating system.By default Vista is set to use only one core during system boot up. But you can easily change this using the system configuration editor.

Follow the steps given below to increase Vista boot speed.

  1. Open RUN by pressing the WIN Key + R.
  2. Type 'msconfig' in the RUN box:


  3. Click on the Boot tab, then click Advanced options:


  4. Click the check box next to Number of Processors and select the total number of cores that you wish to use:


  5. Click OK.

Leave your comments and URL of your blog
[via I,Suman]


Read more...


Use Mouse Scroll in a Best way in Firefox

| Tuesday, August 26, 2008 |

I am an avid fan of Firefox and always keep on searching new tricks to make it better and better for me.I found this piece on TechDreams and found out how to easily use mouse scroll to perform various tasks in a quick and easy way.


1. Moving Back & Forward

Hold the shift key and move the mouse scroll while up and down to move back and forward of the browser history respectively.


2. Close a tab page without even displaying it

Popup ads of yesterday are new tab page ads of today. Few annoying web sites keeps opening popup adds as new tab pages. At times we don’t even want to see what is there in the unwanted tab and close it. Mouse scroll wheels come handy to deal with this situation. Just hover the mouse on the unwanted tab and click using mouse scroll wheel. The tab will be closed immediately.

3. Opening links in a new tab

To open any link on a new tab page just click it using the mouse scroll wheel. In the background Firefox silently opens the link in a new tab page.

4. Scroll line by line while reading a web page

This is the very useful functionality for those who read lot of stuff online. Hold the Alt key while scrolling the page using mouse scroll wheel to move it line by line. This come very handy while you need to scan text line by line.

5. Zoom In and Out images/text
 

Use CTRL + Mouse Scroll wheel to zoom in and out a web page

6. Scrolling though the tabs

If you open many tabs then Firefox adds a tab scroll as it runs out of space to show all the tabs. The general way of scrolling through the tabs is to use the arrows Firefox displays on the edges of tab area. The quickest way to scroll through the tabs is to use mouse scroll. Place the mouse scroll on any tab and move it up and down to scroll through the pages

7. Open a folder of bookmarks with a single click

Bookmark toolbar of Firefox is very handy to create bookmarks of the favourite web sites that we browse often. The bookmark tool bar also allows us to create folder and group the bookmarks under them.  If you click on a folder with mouse scroll wheel, Firefox opens all the bookmarks of the folder in tab pages.

8. Move Up and Down

Click on the web page using mouse scroll wheel to use mouse to move the page up and down


Read more...


Send Secret Messages in Orkut

| |

You must be using Orkut.Don't you?

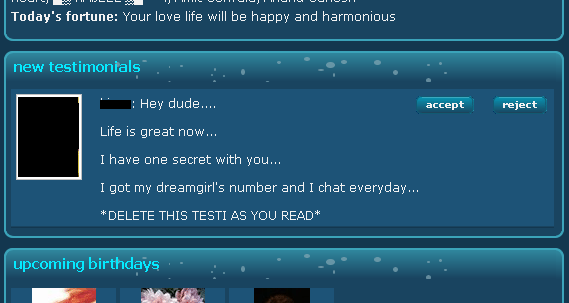
Well everybody is a fan of orkut.But there is one problem that we often face in orkut.The problem is that if we want to send a secret information in orkut then we cannot send it privately.The secret information can be anything like a phone number,address,email id etc.It becomes public or visible to other friends .Now there is a solution to this problem I found courtesy Pavan.

Secret message as orkut testimonial

Hope you all know the orkut testimonials. This is the solution discussed here. Whenever you send a testimonial, it will be popped up in the orkut home just below the recent visitors section. That definitely grabs the attention of user and he will surely notice that! In the testimonial content, don’t forget to write the message that he should not accept the testimonial and MUST reject that. Have you ever tried this before?


Read more...


How to force Firefox extensions to be "compatible"

| Thursday, August 21, 2008 |

One thing that has troubled firefox users after upgrading to firefox 3 is that they are not able to install some of the addons that say the the "addon is incompatible with firefox 3".
But now there is a little tweak that may help firefox users out of this problem.


First you need to type "about:config" in the URL bar in Firefox 3. Note: no quotes when typing this. You'll be warned that you're mucking about with the settings. Just click the "I'll be careful, I promise!" button and you'll see tons of application preferences.

The one you want actually isn't there, so don't bother looking for it. Instead, right click to create a New, Boolean preference. Type "extensions.checkCompatibility" (again, no quotes) as your preference and then choose the value of False for it. Restart Firefox and you should be able to install any Firefox extension.

This doesn't mean that your older extension will work perfectly; after all, it was designed for Firefox 2 or earlier. However, you can at least install and try it. In fact, my gut tells me that this preference is to aid extension developers, which is why it's not included by default.

Remember that you could hose up your Firefox settings and behavior with these types of tweaks, so if you're not willing to take and accept that risk, stay away from "about:config".


Read more...


Make Words Bold in Gtalk

| Saturday, August 16, 2008 |

A lot of people are using Gtalk these days.Its a cool chatting application with a file sharing facility also, but one thing  that you might not know is that how to make words bold in Gtalk.Have you tried this?
Even I never knew it but I came across this thing from Ashish that by placing the words between asteriks(*) you can make them bold.
I have tried it and am showing the pic of same conversation.


Read more...


Missing files and folder names in Vista

| Monday, August 11, 2008 |

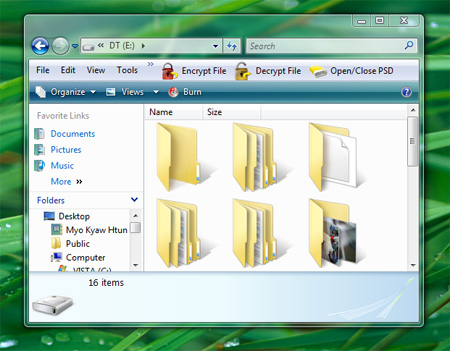
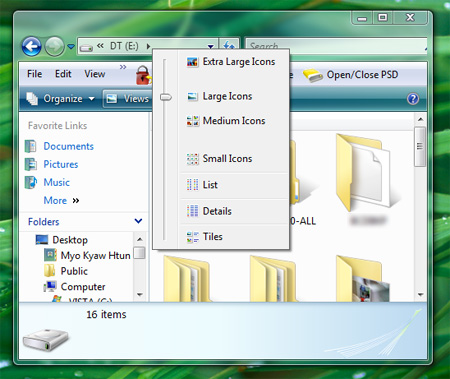
Yesterday my friend Anubhav was faced with a problem in Vista installed on his laptpop. The problem was that all of the folder-names and file-names were missing in large folder view under my drive in Vista. Strange ? huh. Take a look at the following snapshot.

Missing Folders names in Vista

That is always happened when we hold the SHIFT key while we’re opening the drive or folder in Vista. To solve this problem, follow the steps.


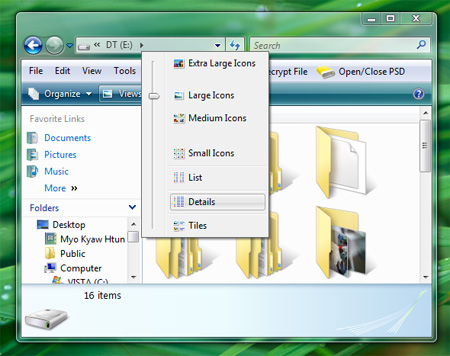
1. Switch to detail view.

Switch to detail view

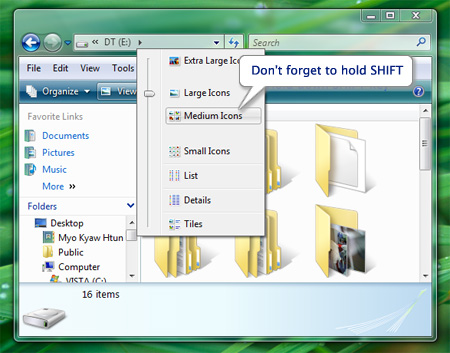
2. Hold down SHIFT key and change to “Medium Icons”.

SHIFT key Medium Icons

3. Close the Explorer and re-open it again. There you’ll get your folder names and file names back.

Larget FOlder views Vista


Read more...


Orkut is banned - virus solution

| Saturday, August 9, 2008 |

Finally!!I had to suffer this problem as well because of which I had to format my harddisk but now you dont have to face any trouble becausehere is the solution to one of the bigger problems of today - orkut is banned error.
Tosday orkut is one of the most well known social networking website.So when such a bug haunts you you get into a deep trouble and get cutoff with your online friends.
But with the solution you need not worry.
This happens because of “Heap41a / win32.USBworm” virus.


This virus can easily spread through removable storage devices especially USB drive. To fix this trouble follow the instruction
1. Open the task manager by pressing Ctrl + Alt + Del
2. Go to “Processes” tab….

3. Look for services name with “svchost.exe”. There will be many namesakes. You have
to look at the name with log in user name.
4. If you find that just delete it or give end process button. It will confirm the process
accept it.
5. Now go to “regedit” from run and navigate the following keys.
HKEY_LOCAL_MACHINE\SOFTWARE\Microsoft\Windows\Current Version\Run
HKEY_LOCAL_MACHINE\SOFTWARE\Microsoft\Windows\Current
Version\Policies\Explorer\Run
6. Look for a key in right side pane with the name “Winlogon”. This will have
“heap41a\svchost.exe” in its value field and delete the file.
7. Now navigate the following key.
HKEY_LOCAL_MACHINE\SOFTWARE\Microsoft\Windows\Current
Version\explorer\Advanced\Folder\Hidden\SHOWALL
And in right-side pane, change value of “CheckedValue” to 1
8. Now enable “Show Hidden Files/Folders” option in “Tools -> Folder Options” in
My Computer.
9. Right-click on Start button and select “Open“. Now open “Programs” folder, here you’ll see a folder “Startup“. Open it and if you get a hidden file there, delete it. If its not there, then close it.
10. At last open “My Computer” and open C: drive. Disable “Hide Protected System files” option in “Tools -> Folder Options“.
11. Check the folder “heap41a” in C: drive. Delete it.
12. Reboot the system then your problem will be fixed.


Read more...


Create Administrator Account using Guest Account

| Sunday, August 3, 2008 |

I was wondering if this was possible. and oh yes it is possible. but the PC in which you want to create an admin account, an administrator who logs on regularly must be present. ( I mean someone with an administrator account must log in ) This process can be divided in to .... lets say about 5 steps. and here are the cools 5 steps to create your own admin account:


1. Right click desktop NEW> Text Document


2.Write the following in the notepad
@echo off
net user Newadmin /add /expires:never /passwordreq:no
net localgroup “Administrators” /add Newadmin

3.save the file and rename it to what ever you want with the extention .bat


4.Copy the file to the Startup folder. Here is the path to the Startup folder:

C:\Documents and Settings\All Users\Start Menu\Programs\Startup

5.The next time the admin logs on into the computer, the batch file runs and the admin account is created. Once the admin logs off, you can log in using the username newadmin and without any password.

Remember that it wouldn’t take long for the real admin to find out that a new admin account has been created.

Hope this helped someone who needs an admin a/C.
[Thanks Sensible Guy]


Read more...


Gmail black theme !!

| Friday, August 1, 2008 |

Yesterday I wrote a post on the BC theme of Gmail.Today I am writing a post on an alternative way to download that theme which I tried and liked.The theme will become a favourite for those who like black colour like me. So, here is that way :
that is required is Firefox and the Stylish Firefox add-on.

Once you make sure Stylish is properly installed on Firefox, follow the steps below.

  1. Open the following stylesheet in a browser tab.
    http://www.globexdesigns.com/gmail/gmail.css
  2. Find the Stylish icon in Firefox on the far bottom-right side of the status bar.
  3. Right click it and select Add File to Stylish.
  4. In the description, write Gmail Black and leave all boxes checked.
  5. Click Save

And you are done! This will give Gmail the ultimate Stylish Black look. For a preview see the screenshots below:

If you ever wish to revert to the boring default Gmail design, simply Right Click on Stylish icon and click Manage Styles, then delete the Gmail Black stylesheet.

[via sizlopedia]


Read more...


Change your Gmail looks by Redesigned 2.0

| |

Due to lack of time to write this piece myself,I am copying this piece from CYBERNET because I thought all gmail users must know about this.
I know that there are a lot of you out there who are using the Gmail Redesigned skin, and you’ll be happy to know that version 2 of the theme was recently released for all Firefox users. This new version includes a few dozen bug fixes, but more importantly they focused on increasing the performance.


Gmail Redesigned 2.0 is almost half the size of the first one, and is actually available in three different formats:

  • Standard - This is the standard compressed version of the script. It will have to load all the images it uses (logo, buttons, etc…) from the developer’s website, which may or may not be something you want to rely on.
  • Embedded - This version is also compressed, but the big difference is that it doesn’t retrieve any of the images from the developer’s website. All of the images are embedded directly in the script using base64 URI’s. The bright side is that none of the images have to be downloaded, but this can hinder performance.
  • Developer - This is the full uncompressed version of the skin that even includes comments. It’s really geared towards other people who are looking to modify the skin.

Gmail Redesigned 2.0 also supports all versions of Gmail, both new and old, including the HTML-only view. Now that’s impressive!

Lifehacker has gotten around to updating their Better Gmail extension to include the new version of Gmail Redesigned, which means you can enjoy a refreshing Gmail interface without needing Greasemonkey.


Read more...


Now you dont need RAM to make system faster !!

| Saturday, July 26, 2008 |

I love vhxn.com posts because he gives such brilliant ideas that are not generally known to the techies. Here is another cool solution to the problem I have always faced due to my low RAM.

MSwin32.dll.vbs AND autorun.inf are the irritations of the computer..!
Today we are facing so many troubles with our computer such as virus problem, Booting problem, Display Problem and Error Messages etc. So here, we have some solutions for solving the slow booting and slow performance of the computer. This problem can be detected by some of Antivirus Programs but cannot be rectified. This problem seems like primordial attempt from viruses. It does nothing more than one problem alike Slow Performance.
Identifying these types of viruses is very easy.
1. We cannot open any windows and drives by double clicking especially USB Drives.


2. An unknown WSCRIPT.EXE, MONIT.EXE and SCVHOST.EXE appear in our task manager.
3. In every drive MSwin32.dll.vbs and autorun.inf hidden files will appear.
What do the Hidden Files do?
1. Make us stumble to open the drives directly. That is we cannot open the drives by double clicking. If it will, open only in a new window.
2. Login and Logout will become very slow.

Removal of the Hidden Files.

We can easily remove this type of files……

However, please note that this virus most often appears only inside the folder along with the virus and same name, which creates .exe files. After removing the virus hurry up to Task Manager and put an end for WSCRIPT.EXE, MONIT.EXE and SCVHOST.EXE.
Below is the detailed explanation.
1. Go to Folder Options (Start > Control Panel > Folder Options)
2. Enable Show Hidden Files and Folders.
3. Make Uncheck Hide Extension For Known File Types
4. Make Uncheck Hide Protected Operating System Files.
5. Click OK.


6. Go to every drive and delete the hidden files WSCRIPT.EXE, MONIT.EXE and SCVHOST.EXE completely.
7. At this attempt, please do not insert your USB drives.
8. Finish the entire removal procedure.
Let us look at the Removal in USB Drives, Digicam, Mobiles, iPods.
1. Click START > RUN > Type regedit
2. Click OK.


3. And delete the following keys.
4. Go to HKEY_LOCAL_MACHINE\SOFTWARE\Microsoft\Windows\
CurrentVersion\Run\wscript


5. HKEY_LOCAL_MACHINE\SOFTWARE\Microsoft\Windows\
CurrentVersion\Run\monit
6. Then navigate the following key HKEY_CURRENT_USER\Software\Microsoft\Internet Explorer\Main
and double click on the Key Window Title.
7. Change that key value to “Microsoft Internet Explorer” (without the quotes :P).

Immunizations
Since this is a stupid little virus, it is easy to immunize yourself from it. And its pretty simple. Make a blank text file named autorun and change its file extension to .inf . (if you can’t see the file extension, repeat Step 2 given above). Now right click the autorun.inf file and check the option which says Read Only, and click OK.
Although this causes little troubles, yet it is very easy to immunize your computer from it. Make a blank text file named autorun and change its file extension to .inf. After creating the file right click on it make it read only.


Read more...


Disable right click on desktop

| |

Now here is a cool funda that is both beneficial and a headache.Beneficial for those who are sick of the people who sit at their desktop and change the settings, the wallpapers etc. and headache for those who do not know about this trick and have left their desktop to the one who knows this trick.
As you might have already guessed the following funda disables the right click on your desktops.

To disable the right click on the desktop:
1. Start Regedit Through Run Command

2. Click Start
3. Select Run Command
4. Type Regedit
5. Click OK
6. Go to HKEY_CURRENT_USER \ Software \ Microsoft \ Windows \ CurrentVersion \ Policies \ Explorer
7. Add a DWORD and give it a name of NoViewContextMenu
8. Make DWORD value as 1
9. Restart the system.
Then the desktop will be restricted.


Read more...


Shortcut to show/hide Hidden Files

| Friday, July 25, 2008 |

Here is a cool way to get a shortcut to show the hidden files and folder.I read it at Cybernews.com and found it quite interesting.I hope you will like this post as well and will show your appreciation in the form of comments.

Here’s how you do it:
1. Open up Notepad and paste in the following text:


Set sh = CreateObject("WScript.Shell")

theKey = "HKCU\Software\Microsoft\Windows\CurrentVersion\Explorer\Advanced\Hidden"

setHidden = sh.RegRead(theKey)

If setHidden = 1 Then

setHidden = 0

MsgBox "System and hidden files will no longer appear in Explorer.",64,"Hidden File Exchange"

Else

setHidden = 1

MsgBox "System and hidden files will appear in Explorer.",64,"Hidden File Exchange"

End If

sh.RegWrite theKey,setHidden,"REG_DWORD"

Set sh = Nothing
2. Save the file with any name you want, but make sure to designate the extension to be “.vbs”:
3. Run the file that you just saved. Give it a few seconds to take affect, but you should see the results without even having to restart Windows Explorer.
4. If you want you can place this script file anywhere you’d like on your computer, and then you can create a shortcut to it by right-clicking on the file. I recommend placing a shortcut to the file in the Windows Explorer Favorites for fast access from the Favorites menu.

Compatibility: I’ve verified that this works on Windows XP, but it only works on Vista when User Account Control (UAC) is disabled. This is because it needs access to the registry, and Vista doesn’t allow that unless it is run as an administrator. Since it is a VBS file the “Run as Administrator” option does not appear when right-clicking on the file.
By default the script will prompt you with the current setting for the hidden files each time you run the script. That way you know whether you are turning them on or off. If you don’t want to see the prompts just remove the following two lines that I’ve highlighted in the code:


Read more...


Logging In Error!

| Tuesday, July 22, 2008 |

Today when I was booting my system, I get some errors frequently which make interruption in my work. I started thinking to get these errors out of my computers and then started following the below steps found working!!!

Exact cause for the problem is whenever the registry’s Userinit key has been modified or a change of registry of Userinit key.
To rectify this problem all we have to do is to change the value of Userinit key
Follow the following steps to overcome the problem.

  • Rush to Run command (Start –>Run or Win Key + R)
  • In Run command type regedit then click Ok. Registry window will be opened


  • Now make a navigation to the following path.

HKEY_ LOCAL_ MACHINE\SOFTWARE\Microsoft\Win¬dows NT\CurrentVersion\Winlogon

  • Double click on Userinit to change the value & restart.Now your computer will take effect.
[thanks vhxn.com]


Read more...